The kitchen of this empty-nest couple featured some nice traditional details: raised-panel cabinets, ogee-edge granite countertops, a tray ceiling and an arched architectural feature over the peninsula. But taken together in the tight U-shaped layout, the result was a space that looked like it had a bit too much going on.

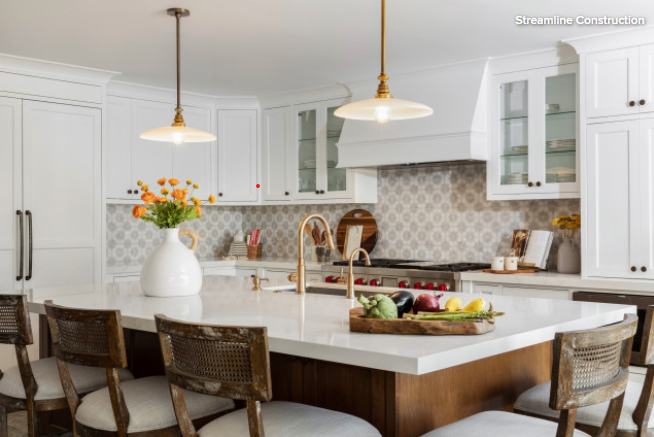
In search of a more streamlined look with an updated classic style and an island, the couple gathered inspiration photos on Houzz and then hired designer Olga Dean and builder Jason Adams. The remodeling team created an L-shaped layout with a central island. New crisp white Shaker-style cabinets and a marble tile backsplash in a lively pattern bring a fresh take on tradition. A stained wood island adds warmth and complements the existing walnut flooring. And a hidden baking center is a fun and functional surprise.

Before: The former kitchen was pretty enough with its creamy white cabinets, beige backsplash tile and beige granite countertops. But an abundance of little details — like the raised-paneled cabinets, ogee countertop edge, tray ceiling and band of backsplash tile — gave the space a busy look. “She had that tray ceiling, and we thought about keeping it but decided to take it out and not draw attention to the ceiling’s 8-foot height,” Dean says.

Plus, the U-shaped layout with a peninsula on the left squeezed the cabinet storage together while leaving a lot of open floor space to navigate. “It really bothered her that she had a peninsula,” Dean says. “She really wanted an island. She wanted the extra seating and continuity of an island.”

After: The remodeling team knocked the kitchen back to the studs and eliminated the recessed section of the ceiling. It also removed the peninsula, the arched architectural detail above it and a support post, replacing the latter with a structural steel beam in the ceiling.

The team relocated the refrigerator and replaced the former separate cooktop and wall oven arrangement with a 48-inch dual-fuel range. The cabinets are now in an L-shaped layout, and the new 9½-foot stained maple island offers seating for five.

Simplified white Shaker-style cabinets (Warm White by Dunn-Edwards), 6-by-6-inch patterned Carrara Blanco marble backsplash tile and marble-look quartz countertops provide an updated look on traditional style. “She’s incredibly traditional, and I had to encourage her to get outside of her comfort zone,” Dean says. “At first she wanted it all white, but going with the two-tone kitchen achieved her design goals of staying with a traditional look but with a fresh twist.”

The range with six burners and infrared griddle sits on the wall that formerly held the refrigerator. “We placed the range in the new location so it would have more visual prominence with the hood and backsplash,” Dean says.

The wood island base complements the walnut floor, which together anchor the room with warmth. The back of the island has storage for infrequently used items.

A pair of 15-inch pendant lights with white glass dish shades hang above. “We wanted something that was light and fresh but also didn’t want to draw attention to the 8-foot ceiling,” Dean says.

The pendants have a hand-rubbed antique brass finish that coordinates with the distressed antique brass finish for the cabinet knobs and pulls and distressed French country-inspired stools.

The kitchen also has undercabinet light strips and new LED recessed lights in the ceiling. (The latter were removed from these photos by the photographer to help focus attention on other design details.) “There are also puck lights inside the glass-front cabinets,” Dean says. “Those look so pretty at night.”

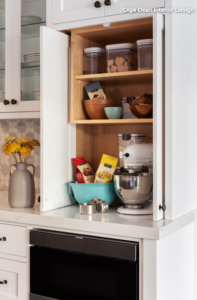
To the right of the range, the baking center behind retractable doors has room for a stand mixer and other supplies. “She wanted an appliance garage at first, but I wanted to add height to the cabinetry and suggested a baking center,” Dean says. “It’s something she absolutely loves, with those doors that retract into the cabinet.”

A 24-inch stainless steel microwave drawer sits below.

The interior side of the island features paneled dishwasher drawers and a paneled trash and recycling center.


Before: This photo of the former kitchen shows the obtrusive arched architectural detail over the peninsula, as well as the support post at the end.

In the rear, a narrow doorway connected the kitchen to the formal dining room, leaving a nook with a bank of corner cabinets that broke up the flow of the home.

After: Dean extended the kitchen into the former nook space and removed the corner cabinets to establish a more open connection to the dining room.

This view also showcases the new 33-inch stainless steel undermount sink in the island and the pull-down faucet in a gold finish that slightly deviates from other metals used in the kitchen. “I’m a lover of mixed metals,” Dean says. “The key is to have them complement one another.”

An existing single glass door and double French doors connect the kitchen to the back patio with a pool, cabana and view of rolling hills.

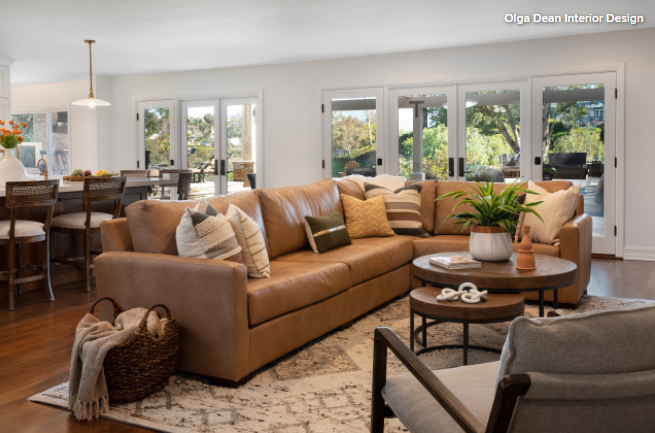
The kitchen also opens to this family room, which features a large camel-colored sectional and ample natural light thanks to multiple glass doors. “We updated the entire space so it now feels fresh and inviting,” Dean says.

Wondering if it’s time to hire a general contractor? These pros are experts at managing all aspects of a project, including applying for building permits, hiring subcontractors, overseeing work and cleanup, and more. If you’re thinking of undertaking a major home improvement project, remodel or new build, a general contractor will likely be a key member of your team. Here are 10 times it makes sense to work with a general contractor to help your project run smoothly.

General Contractor vs. Specialized Contractor

A specialized contractor is a pro with a single specialty area of practice, like electricians and plumbers. A general contractor (GC), on the other hand, oversees all on-site aspects of a construction project, including the work of any specialized contractors. The GC is your point person — the one with a bird’s-eye view of the entire project and the person you call about everything related to the project.

1. You’re Ready to Implement an Architect’s Plans

If you’ve been working with an architect to design a custom home, once the plans have been finalized it’s time to find a contractor who can bring the design to life. It’s important that these pros work well together, so if your architect suggests contractors he or she has worked with before, it’s a good idea to consider getting bids from them. But even if you do go with one of the contractors your designer suggests, don’t neglect to do your own due diligence — check references, ask to see past work and double-check that he or she is insured.

2. You Want to Exercise Your Design Chops

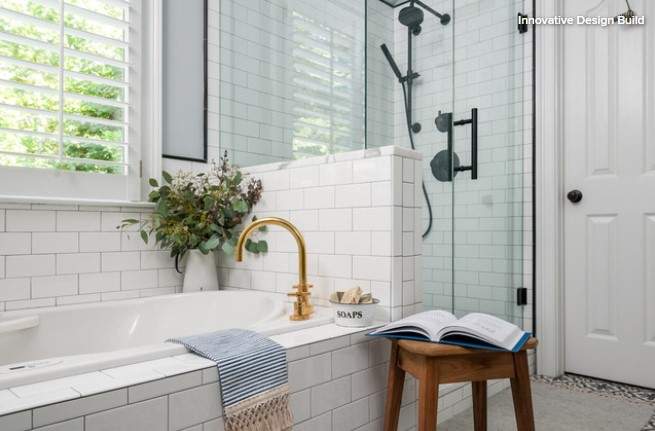
This certainly isn’t the case for all homeowners, but for a certain design-savvy subset — like Houzz contributing writer Becky Harris, whose remodeled bathroom is shown here — taking on a (relatively) small design project with the help of a general contractor is an exciting proposition. Working with the pros at Innovative Construction, Harris selected her own fixtures and finishes to transform a ho-hum bathroom into a light and lovely space.

Tip: If you’re planning to go right to a general contractor without hiring a designer, it’s a safer bet if you’re keeping most elements in the same place. In other words, the more complexity involved, the likelier you’re going to need to bring a designer on board.


3. You’re Making Changes to Your Kitchen

Anytime you know you’ll be needing multiple pros at work on a single project, it’s usually worthwhile to hire a general contractor to oversee and coordinate the project. In a kitchen, for example, pretty much any work that goes beyond altering a single element (like replacing appliances) will require multiple pros, including a plumber, an electrician and a carpenter or cabinetmaker. Your general contractor can maintain the larger vision for the space (including a kitchen designer’s plans, if you’re using them), hire and oversee subcontractors, schedule the work and maintain the site.

4. You Want a Simple Addition

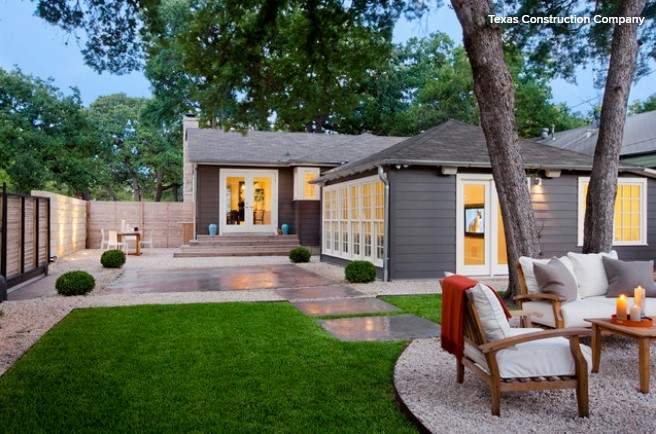
In some cases, you may want to hire an architect to create a plan for an addition that integrates seamlessly with the rest of your home before hiring a general contractor. But in other instances a contractor who specializes in additions can take the lead. Ranch houses, like the one shown here by Texas Construction, are especially well-suited to easy additions because of their horizontal layout and single-level living. A contractor can obtain a building permit and build your addition to code.

5. You Need to Restore After a Fire, Flood or Storm

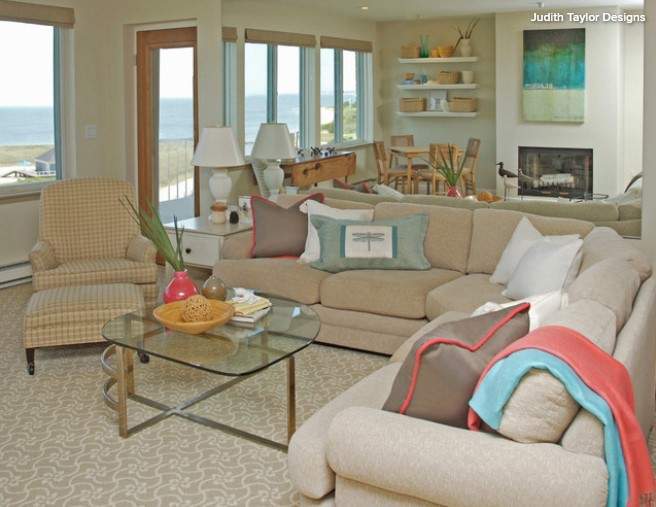
When the Cape Cod, Massachusetts, condo of interior designer Judith Taylor was flooded during a nor’easter, the entire interior was damaged, necessitating a top-to-bottom restoration. From installing new drywall and doing electrical repairs to replacing the floors and repainting, the work after an event like this can be extensive. A general contractor can be your point person to see you through the process of getting your home in shape so you can move back in.

6. You Want to Make Structural Changes to Your Home

Hoping to knock down a wall and open up your space? You may choose to hire a designer or an architect to do the design work if there’s more to it than that, but if what you have in mind is pretty straightforward, your best bet for getting started is probably a general contractor. This pro, once you’ve found the right one, can help coordinate all of the work, from having a structural engineer assess the space to overseeing the construction and electrical work.

7. There’s a Safety Issue That Needs Addressing

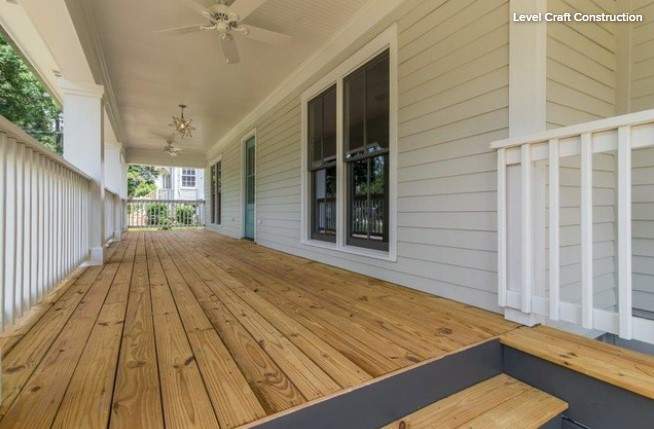
It may be tempting to hire a handyperson for what seems like a small job, but if the safety of your family and guests is at stake, it’s critical to bring in a pro who knows the building codes and can complete the work with safety in mind. Whether it’s a deck that has rotted out and needs to be replaced, a faulty railing or wobbly steps, take the issue seriously and hire an experienced contractor to oversee the work.

8. You’re Done With DIY

If you’ve bitten off more than you can chew with a DIY home improvement project, it’s important to know when to hang up your (hard) hat and call in a pro. A general contractor can help guide your project to completion, no matter what stage it’s in.

9. You Need Permits

Whether you’re putting in a new fireplace, modifying the roofline of your home, or doing any number of other projects, if you need permits, that’s a good sign that you could use a general contractor. General contractors are well-versed in local building codes and ordinances, and can apply for any permits your project requires.

10. You Bought a Fixer-Upper

If you bought a fixer-upper, chances are there’s enough work on your docket to keep a contractor busy for a good long while. When Peggi and John Fu purchased the home shown here, they knew that picking the right contractor would be key to getting all of the necessary work done on a tight timeline. The couple went with Slater Construction because the contractor was open to using materials they sourced themselves. Even on a small budget and tight schedule, they were able to transform what was a warren of small rooms and hallways into a light and bright home still in keeping with the midcentury feel of the neighborhood.


This article was originally published on houzz.com

Let’s face it, some colors and materials clash while others seem like a match made in heaven. In a kitchen, where large planes of cabinets, countertops, backsplash and flooring carry a lot of visual weight, getting the mix right is especially important. Here are five gorgeous design and remodeling projects that pro shared details on, including the materials and tones they used to create stylish combinations.
1. Light Gray, Wood and Gold

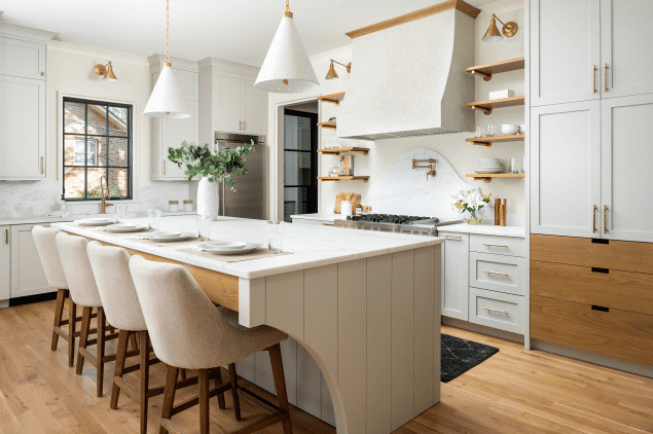
Homeowners’ request. “Clean lines, a subdued color palette and understated elegance and craftsmanship,” Woodshop QC cabinetmaker Charlie Henderson says.

Color and material combo. Shaker-style cabinets with slab-front top drawers in soft gray paint (Gray Owl by Benjamin Moore). Solid white oak accents in a custom pecan stain. Marble countertops and backsplashes. Brass fixtures and hardware.

Other special features. Vertical shiplap island detailing. Custom plaster range hood. Solid white oak floors in a custom stain.

Designer tip. “Rhythm, like in music, creates cadence in your design while also engaging the viewer,” Henderson says. “Notice the repeating soft curves on the simple cove crown molding, the front swoop on the range hood and the island end panels.”

“Uh-oh” moment. “Originally we had designed upper cabinets flanking the range hood, but it all just felt too cramped,” Henderson says. “We wanted the textures and lines of the range hood and backsplash to really stand out, but the uppers were both imposing and distracting. After some consideration, we had the idea to go with the metal wall-mount brackets and open shelves. This then allowed us to incorporate both the white oak and brass that we were using elsewhere.”
2. White, Wood, Black and Gold Metal

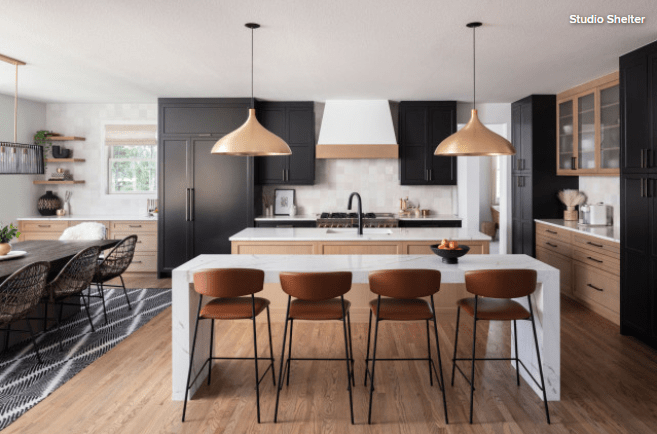
Homeowner’s request. “The client is an Instagram influencer who uses the space to demonstrate products and wanted a fresh and stylish place to do so,” says designer Kelly Flynn, who used Houzz ideabooks to collaborate with her client. “The flow for cooking was also not ideal, so we brought the refrigerator closer to the work area for easy access. Using the space on the opposite wall for the pantry and coffee bar made the area feel larger and better used. There was also a lot of underused space in the kitchen, so we were able to add two islands, which is terrific for entertaining. We converted an unused desk space into a bar with a wine fridge.”

Color and material combo. Custom stained white oak cabinets and black cabinets (Black Magic by Sherwin-Williams). Calacatta-marble-look quartz countertops. White zellige-style backsplash tile. Red oak flooring. Black, gold and silver metal details. “Having several metals keeps the space versatile, while the combination of colors for the cabinets and countertops keeps the space fresh yet bold,” Flynn says.

Designer tip. “It’s really important to take the cabinets up to the ceiling,” Flynn says. “The look is far more complete and updated-looking.”
3. Wood, Brown, Green and Mixed Metals

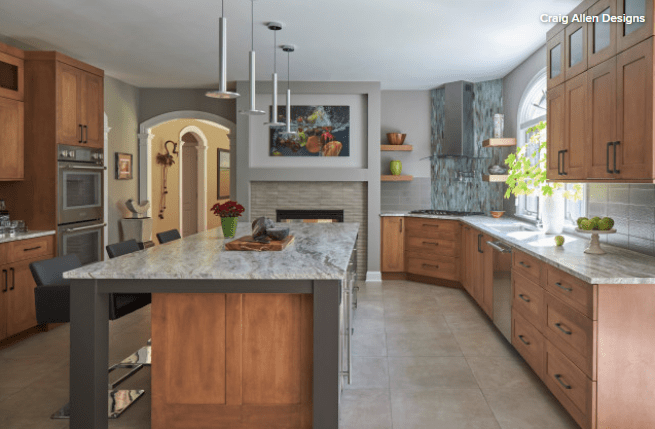
Homeowners’ request. A contemporary-transitional kitchen with a zen-like atmosphere. The homeowners disliked having their cooktop on the island, so designer Craig Teitsma, whose clients found him on Houzz, took out some cabinets to the right of the fireplace and created an angled wall that now supports a cooktop and vent hood.

Color and material combo. Light-stained maple. Shaker-style cabinets. Deep, dark brown slab drawers and other details on the island (color based on Dragon’s Breath by Benjamin Moore). Fantasy Brown quartzite countertops. Gray walls (Stone Harbor by Benjamin Moore). Sage green textured glass backsplash tile with shimmery diamond-shaped backsplash tile behind the range. Beige porcelain floor tile. Stainless steel appliances. Oil-rubbed bronze cabinet hardware on the perimeter. Satin nickel hardware on the island.

Other special features. Geometric 3D tile fireplace surround.

Designer tip. “Don’t be afraid of different colors, textures and patterns,” Teitsma says. “Too many people just do a ‘safe’ white kitchen with a subway tile backsplash and a marble-look quartz countertop. And while this is beautiful and timeless, it can also be a little boring. If there is a color, texture or pattern that you see in a tile store or cabinet store that you like, implement it into your space. I don’t think you will regret it.”

“Uh-oh” moment. “Finding just the right stain color was a trick,” Teitsma says. “We found a stain we liked from another cabinet manufacturer that I use, so we had my higher-end line match it. Well, the first three matches that we got back were not quite right. Too red. Too yellow. Too green. Finally we got the right color and had a larger sample made up on a door for us to see it at scale. Approved. But when the cabinets came, the color came in darker than expected. Oh boy. I told the homeowners to let me continue installing the cabinets so that we can see it all put together, step back and have a complete picture of how it is going to look. Once we finished the install, we felt that the color was at the least acceptable, and some of us liked the color even better than the original sample.”
4. White, Wood and Black Metal

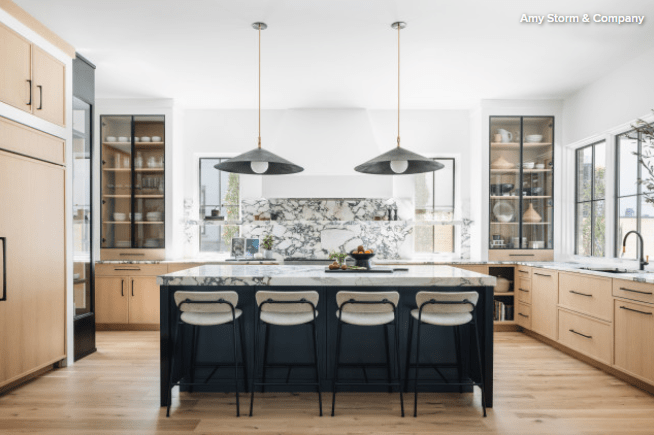
Homeowners’ request. “Our clients are passionate about nutrition, organization and cooking, so the kitchen is a special place in their home for them to exercise their passions,” designer Kelsey Demetralis says. “They wanted to create a functional and thoughtful space that reflected their personalities. The floor plan forms an open kitchen layout with a visual and functional connection to the butler’s pantry, which is more of the workhorse and keeps the mess behind the scenes.”

Color and material combo. Rift-sawn white oak cabinets in a custom stain. Black island with blue undertones (Railings by Farrow & Ball). White walls, plaster hood and glass-front cabinets (White Heron by Benjamin Moore). Black powder-coated metal accents. Natural oak flooring. Red Vein Calacatta marble backsplash, countertops and shelf. “The driving force of the kitchen design is the stunning, exotic marble slabs,” Demetralis says. “Its application was simple, but also the piece that gave us the most dramatic impact.”

Other special features. “We all agreed the island needed some metal detailing to tie in with the rest of the kitchen design, so we added black metal legs and applied them against the black painted island, creating texture and depth,” Demetralis says.

Designer tip. “Mix in personal and found pieces to create a comfortable yet refined space that really reflects you,” Demetralis says. “Don’t be afraid of mixing the old with the new. There is nothing better than stepping into your home and feeling like it is truly a representation of you and your life.”

“Uh-oh” moment. “One tough detail that took a lot of thinking, site meetings and collaboration was the stone shelf across the windows,” Demetralis says. “It took a combination of many vendors to make sure the sizing was right, placed at a perfect height for the client, had enough support to function correctly and still looked pretty from the front and back since it spanned windows. Talking through details on site makes all the difference, and getting everyone in the room 9 out of 10 times is the way to create a solution and ensure everyone is on the same page. It saves everyone time and money.”

5. White, Dark Wood, Blue and Brass

Homeowners’ request. “The homeowners wanted a home with a Portland-hip outdoorsy style with some midcentury modern flair,” designer Victoria Chen says. “They wanted a mature yet fun look.”

Color and material combo. Dark brown ash lower cabinets. Sleek white uppers. Blue backsplash tile. Brass hardware, faucet and lighting. Black details. “We went for a white base to brighten up the space but added wood texture, unique color tones and calming pop of colors to the mix to create an interesting, fun design,” Chen says. “The darker lower cabinets created a sense of grounding and tranquillity. And the white upper cabinets and countertops reflected more light into the space to give a more open and spacious perspective.”

Designer tip. “Think about flow and function first,” Chen says. “A design should be functional and support the lifestyle of the owners. Then, on top of that, add color, style and everything that’s pretty.”


This article was originally published on houzz.com.

bright blue kitchen

With residents of cold regions experiencing or preparing for snow, plus all the holidays, December is a busy month. But with a little preparation (and some quiet time), you can savor the best of the season, whether it’s winter walks or hot cocoa. Check off these tasks for a less hectic, more harmonious month.

Things to Check Off Your List in an Hour or Less

Disconnect hoses. If it freezes in winter where you live, now is the time to shut off the water supply to your outdoor faucets if you haven’t done so yet. After shutting off the water, turn on the faucets outside to allow any water left to drain out. Then disconnect garden hoses, drain the water and roll them up to store indoors until spring.

Keep an eye on trees. A buildup of heavy snow on tree limbs can make them more prone to breaking. Brush snow off tree limbs after each big snowfall, using a broom to extend your reach. If a limb does fall, have it removed as soon as the weather permits.

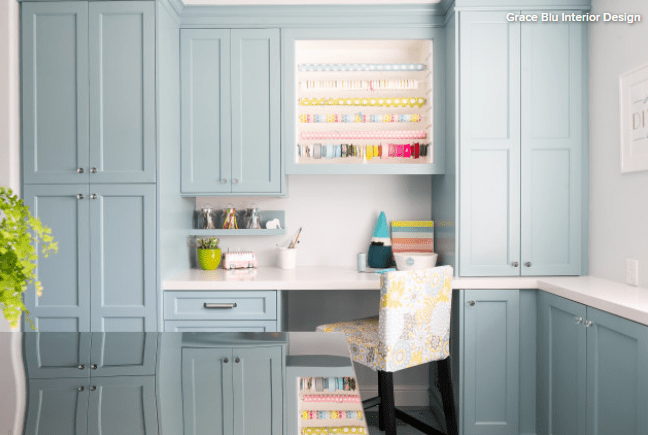
Set up a gift-wrapping station. Stock up on wrapping paper, plain boxes, ribbons, gift tags and tape, and store everything in an easily accessible spot near a work surface.

Having all your supplies ready to go will make it much more appealing to wrap gifts as soon as you buy them — instead of waiting until the last moment for a marathon wrapping session.

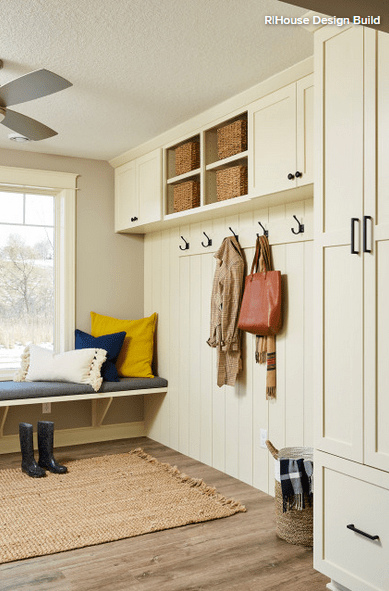
Make space for winter coats, boots and scarves. With winter weather come bulky coats, boots and all sorts of mittens and scarves that seem to multiply when you’re not looking.

Clear out the closet nearest your main entrance to make room for those extra winter layers, or supplement a hall with coat hooks and a boot tray.

Tackle These Tasks Over a Weekend

Put up outdoor holiday decor.
Dig out those Christmas lights early in the month so that you have ample time to test strands and replace nonworking ones before the holidays. Hang exterior lights and wreaths, being sure to use only exterior-rated lights, and plug them in safely in an outdoor outlet.

Add winter evergreens to outdoor spaces. Try boxwood in containers decked out with twinkling lights. Living Christmas trees and evergreen wreaths are also good choices for the front porch.

Simplify your holiday. If you tend to feel overwhelmed at this time of year, take a timeout to set some intentions for your holiday season. Focus on a few meaningful activities that you really enjoy, and give yourself permission to say, “No, thank you” to activities that stress you out.

Get ready for winter storms. Check the condition of your snow shovels, gloves and window scrapers, and replace as needed. Store snowy-weather supplies near the door where you can access them easily in a storm, and mark the sides of your driveway and other key places with reflective poles, to help the snow plowers see where to go. And even if it doesn’t snow where you live, keeping the pantry stocked with food, bottled water, candles and flashlights in case of power outages is always a good idea.

Block drafts. If you feel a draft, don’t just reach for another throw blanket — apply weatherstripping to the drafty area to warm up your house and save on your energy bill. If the cold air is getting in under a door, what you need is a door sweep. Usually made of hard plastic, a door sweep attaches to the bottom of your door, sealing off the gap that lets in cold air.

Maintenance and Extras to Budget for This Month

Spruce up indoor play areas. When you have kids at home, harsh winter weather can mean more playtime indoors. Stave off cries of “I’m bored!” with a spruced-up play space. A bit of reorganizing and a few simple purchases (like a giant roll of paper and fresh markers) can make your same old space feel like new.


Carve out a space to find your Zen. What with family stress, packed schedules and world events, it’s especially important for our well-being to carve out moments for calm and reflection during this busy season. Create a personal retreat at home by clearing a space for yoga, meditation or relaxation. It certainly doesn’t have to be as grand as this one; it can simply be a space that’s slightly bigger than a mat, in any room. Just make the time to use it.


Have your chimney cleaned. If you haven’t done so yet, be sure to schedule a cleaning with a certified chimney cleaner before you light that first fire of the season. Creosote can build up in the chimney, increasing the risk of a house fire.

Update your emergency kit. Be prepared for power outages and other emergencies by making sure your house and car are outfitted with well-stocked emergency kits. The basics include bottled water, a hand-crank radio, a flashlight with extra batteries, a cell phone charger (hand-crank or battery-powered is best), food, blankets and a first-aid kit. At home, keep essential documents in one.

Plan for holiday home safety. A few simple precautions — such as illuminating the area around your house, locking doors and windows, and trimming bushes — can go a long way toward keeping your home safe.

And with night falling earlier this month, and many people headed out of town, it pays to be extra safety-conscious, whether or not you are going anywhere.


This article was originally published on houzz.com

rustic kitchen with modern stools and white cabinets

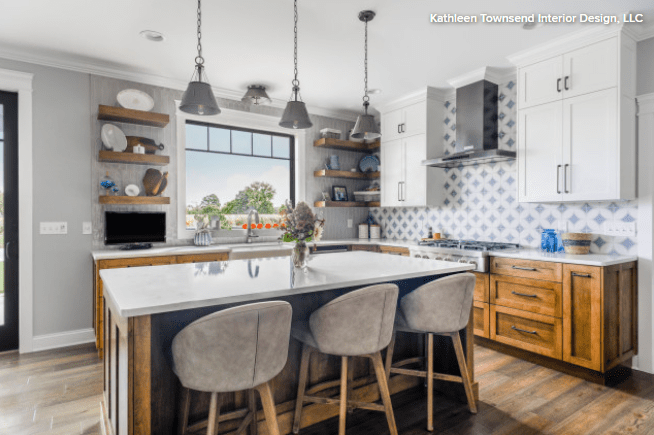
As retirement approached, the bucolic appeal of central Michigan was calling to this couple. So they decided to get out of the Saginaw, Michigan, suburbs and move to a cornfield-surrounded property they had fallen in love with. Though they had a very strong vision for the new home they were building there, they knew they needed some professional help with the interiors. Once the house was framed, they looked for an interior designer on Houzz and chose Kathleen Townsend. She helped bring their vision to life, incorporating the soft color palette and personalization they wanted in their forever home.

living room with kitchen in background
Photos by Brendan Ross

The homeowners had a definite vision of what they wanted, including soft grays and blues, two-tone cabinetry and open shelving to display their treasures. Townsend helped them finish and furnish their spaces in a way that tied the rooms together. Cohesiveness was important within the open floor plan.

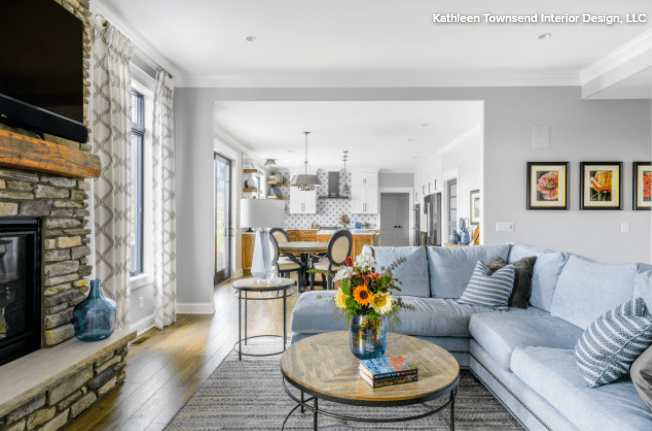
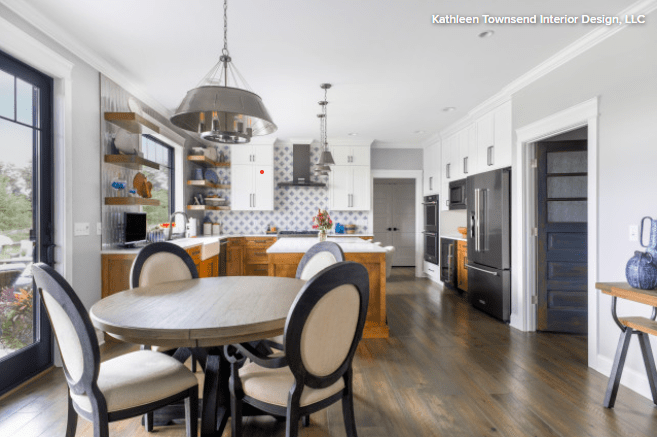
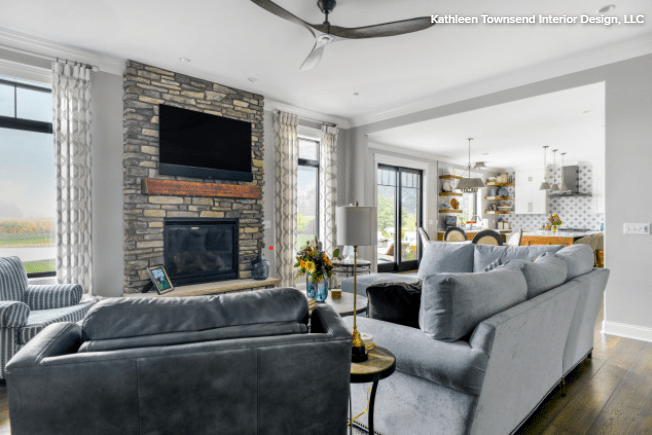
From the great room, the kitchen’s blue diamond backsplash wall provides a beautiful view. Townsend created cohesion between spaces with the color palette and finishes. For example, the walls in the great room, dining area and kitchen are all painted in Benjamin Moore’s Repose Gray. The backsplash plays off the blue sofa. The flooring throughout the house is engineered white oak.

dining room table in kitchen

In planning their new home, the owners were looking forward to gathering with their adult children and their grandchildren. This area serves as their casual everyday eat-in area as well as the formal dining room. Extensions allow them to expand the table and make room for the whole family when needed. The chandelier is from the same collection as the pendant lights over the island, tying the two spaces together.

The door with the glass panels on the right is architectural salvage the homeowners found in Detroit. It opens to a walk-in pantry that includes open shelving and cabinetry that provide all the space needed for food storage. The couple replaced the original glass in the door with opaque glass to block the view of shelves full of food. The opening seen at the back of the photo leads to the mudroom.

rustic kitchen with modern stools and white cabinets

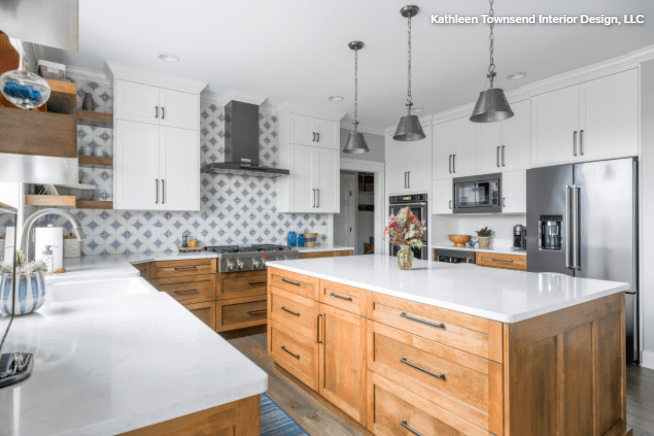
When Townsend was hired, the placement of the windows and doors had already been established. “They have these black-framed windows with transom frames at the top throughout the house and they are so pretty,” she says. The large window over the sink has lovely views out to the cornfields that surround the property.

Another must-have on the homeowners’ list was open shelving. “She wanted to be able to display heirloom items that had a lot of meaning to her and enjoy them every day. They are treasures to her,” Townsend says. The open shelves maintain a light feeling around the window. Upper cabinets would have closed in the window and blocked the view to the cornfields from the other spaces.

The window wall’s backsplash is composed of glass picket tiles in a soft gray. “If we’d continued the diamond tiles around this wall, they would have overwhelmed the kitchen,” Townsend says. Instead, the quieter glass tiles put the focus on Grandmother’s china and the view out the window.

rustic kitchen with white countertops and white cabinets

The two-tone cabinets are a mix of maple and white paint. The white upper cabinets fade into the background while the maple base cabinets add warmth. The hardware on all the cabinetry is aged bronze.

The island measures 6 by 3 feet, with seating on one side and storage on the other. The suede counter stools tuck neatly out of the way beneath the countertop. The countertops are Torquay quartz by Cambria, which has subtle marble-like veining. The quartz is low-maintenance and more durable than real marble.

The clients opted for blackened stainless steel for the appliances. These have a darker look than standard stainless steel. The light fixtures have an aged steel finish.

living room with gray couch in front of fireplace

The doors off the dining area lead directly out to the patio, making it easy for the couple to entertain outdoors.

patio with wicker furniture with stamped concrete

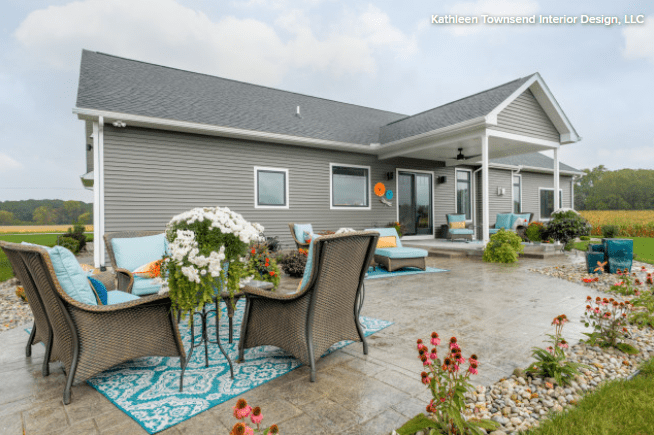
Here’s a look at the large patio, the porch and the relaxing rural surroundings.

“They just hosted a baby shower for one of their children a few weeks ago,” Townsend says. “They are so happy in their new home. While they continue working, their commutes are a bit longer, but it’s well worth it to them.”

This article was originally published on houzz.com

Fall landscape

Fall is the best time to garden, and it’s about time we realized this. Not only is cooler weather easier on new plants and tired bones, but planting in a spent garden with rain on the horizon also has advantages. Here’s more on why planting in fall can make spring gardens more robust than we might have imagined.

Cooler Weather Helps Plants and People

I confess from the get-go that I’m an autumn junkie. I love the cool mornings followed by warm afternoons and a return to coolness in the evenings. I love the leaf colors, which are so much more profound than those of flowers. I love the insects rushing to gather pollen and nectar to overwinter or migrate. I love the smell of decay after a rain shower. I love the first frost hanging on every leaf and stem. But I really love autumn for the gardening energy it provides — I’m not sweating 30 minutes into planting or dividing, and the soil is very workable, so I can go for hours.

Plants love fall, too. Their leaves aren’t stressed by scorching sun, and cooler temps lessen the demand for water from the roots. I’m a firm believer that fall-dug plants are more robust than spring- or summer-dug plants.

Less Watering Means Lower Maintenance

If you plant in spring or summer, more often than not you have to dutifully keep up with watering during those first few weeks or months. Constant observation of your new darlings gets tedious as the heat ramps ups.

When planting in fall, I water the plants in their pots a few hours before digging so they can soak up what they need, then I stick them in the ground and leave until forever. Now, I’m talking perennials here. For shrubs and trees, it’s good to thoroughly water the soil in the new hole to get it nice and tight around the new roots you’ve teased out from the root ball, and a warm day in January might be perfect for watering if it’s been a dry winter.

You Can Plant Later

Let’s say you buy a tree at 50 percent off before the nursery closes for winter in mid-October. Ideally, you’d plant it right away, but really you’re fine waiting several weeks, so feel free to go watch some football. I’m in USDA Zone 5, and we garden mavericks dig shrubs and trees into late November.

In fact, it might be easier on the trees once their leaves are gone. There’s less pressure to devote resources to keeping them alive, and all of their effort is dedicated to growing roots. That’s the benefit of fall digging for all plants: You’re helping them concentrate on roots, so when they come back in spring, they’re ready to put on more top growth in the form of lovely foliage and stunning blooms. If you plant in spring or summer, you have to wait an entire year to see those results.

planting plantsSmaller Sizes Make for Better Plants

This is a bit of a generalization, but overall you might as well save money and buy smaller plants — 3-inch pots and plugs, trees in gallon containers and more. With a smaller root zone that, hopefully, isn’t spun round and round the root ball, you’ll get a plant that will suffer less from transplant shock and become established as fast as, or faster than, a larger specimen.

I love the small pots pictured here. It’s easier to tease out the roots so they make contact with the new soil in my garden, and they’re easier to haul around. After a few hard freezes, make sure you have a few inches of mulch tucked in around your plants to prevent frost heaving (if you live in an area where the ground freezes).


backyard pagoda


It’s Easier to See Where You Need to Add Plants

Of course, you should leave your plants up for winter to help the garden insulate itself, capture moisture and protect overwintering pollinators, but it also will help you see where the gaps between plants are. Maybe a grass is needed in an open spot, or you realize you want some spring blooms to pop in one bed. Now’s the time to make those changes while the mosquitoes and leaves are gone. You can actually see the ground and get to it through the skeletons of the year’s growth.

How long into fall that you can plant obviously varies by location: In the northern regions or at higher elevations, you’ll want to be digging in August and September, whereas toward the coasts and the southern regions you might be able to go into December.

Over the years I’ve come to do most of my planting and dividing in fall, so that when spring comes, all I have to do is go outside and enjoy the fruits of my autumn labor.

The plants will thank you with more robust root systems and hopefully a show worth savoring from the nearest garden bench.

Little girl listening to headphones

Outfit your kids with smart technology to help them succeed this year!


Depending on your perspective, this is either the worst or more wonderful time of the year. While parents celebrate the return to school and kids lament the loss of summer vacation, you can make everyone’s transition a bit easier, thanks to smart technology.From empowering backpacks and intercom alarm clocks to the optimal headphones and GPS-tracking wristwatches, we’ve identified the gadgets you should grab before sending the young ones back to the classroom.

Amazon Echo Dot (4th Gen)

amazon echoAny parent can tell you that the toughest transition for back-to-school can be the first of the day—rousing your child early after a summer of sleeping-in. Amazon Echo Dot is here to make it easier. Not only is the device a top-of-the-line smart speaker that your child will enjoy, but it operates as an ideal alarm clock. The spherical Dot features the time emblazoned on front and can be easily set to sound an alarm (or song, chosen by your child) at the time they need to be up (chosen by you, the parent). Better still, thanks to Echo’s Drop In feature, you can turn the Dot into an intercom, allowing you to communicate with your kid from your phone, from the kitchen, instead of trudging upstairs a dozen times to cajole them out of bed.

The Amazon Echo Dot (4th Gen) is available for $49.

PuroQuiets Headphones

pink headphonesOf course, you won’t be the only one supplying your child with technology—nearly all classrooms now incorporate some computer or tablet work throughout the day, and for everyone’s sanity, that means headphones are needed. Check out the PuroQuiets from Puro Sound Labs. These sturdy headphones feature Bluetooth technology, allowing your student to easily connect to whatever device they need to use, and should they forget to charge their Quiets—a common occurrence with kids and technology—the headphones also come with a 3.5mm audio cable for an easy, manual connection. As a bonus, the PuroQuiets include noise canceling technology (hence the “Quiets” name), allowing your student to focus on the task in front of them and not the latest gossip from their seatmate.

PuroQuiets Headphones are available in three colors for $129.

Nordace Siena Smart Backpack

green backpackStylish and smart. Give your young one a leg up with the Siena Smart Backpack from Nordace. This fine-looking portable locker, which is available in nine colors, comes equipped with a built-in USB charging port, so your student will never have an excuse for, say, having their school headphones uncharged. In addition to an energy source, the Siena features a dedicated, padded and secure sleeve to house a 15.6-inch laptop, tablet or similar, ensuring that their essential school technology is safe throughout the rigors of day.

Nordace Siena Smart Backpack is available for $109.

Xplora x5 Play Smart Watch

smart watchKeeping track—and in touch with—your little ones can be a tough proposition, especially when they are too young for a cell phone. Fortunately there is the X5 Play Smart Watch from Xplora. This intelligent wearable not only provides parents with a GPS location of their child (allowing you to see exactly how close the school bus is to home), but also allows pre-approved numbers to send texts or calls to the device, giving parents a chance to offer encouraging words or important messages (like, clean your room when you get home) throughout the day.
The Xplora x5 Play Smart Watch is available for $149.

This article was originally published on Mansion Global.

As summer approaches, some folks may be taking a closer look at their outdoor spaces and thinking about the projects that could make them more comfortable. Perhaps this is the summer you invest in outdoor seating that better suits your needs or plan for the patio or grill setup you’ve been dreaming of — to enjoy with your family in the short-term, and with others when social distancing relaxes.

We’ve rounded up a number of outdoor upgrades — ranging from smaller investments like adding a patio umbrella or string lights to more extensive projects like installing a deck or outdoor kitchen — that can help make outdoor living easier and more enjoyable. Take a look and tell us, could you see your backyard benefiting from one of these features or setups?

1. Add a Patio or Deck

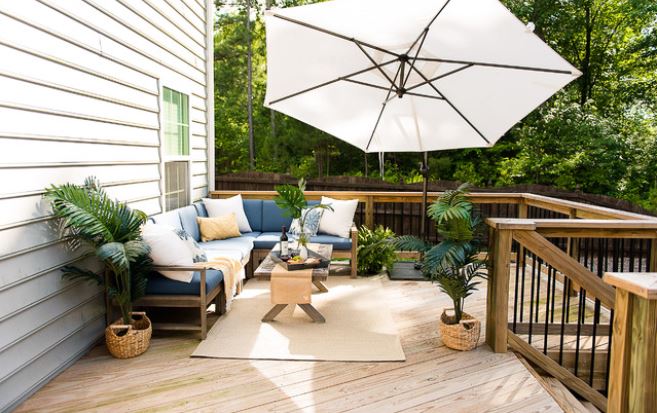
If most of your garden is lawn or planted areas, investing in a patio or deck can be a real boost for the ease of outdoor lounging. Outdoor furnishings like tables and chairs sit more firmly and move more easily on a hard, even surface. Decks that are brought up to the same level as a home can foster better indoor-outdoor flow and make it easier to bring a tray of food to an outdoor dining table.

A deck or patio doesn’t have to be massive to be useful. In this home in Southern California by Christiano Homes, a small deck provides a room for the homeowners to relax on two lounge chairs right off the living area.

2. Splurge on Comfortable, Durable Furniture

The more you can bring the comforts of home outside, the more you will be tempted to sit back, relax and enjoy. Choose chairs that support your back and sofas and lounges with deep comfort. Invest in durable materials such as teak, aluminum, synthetic resin and powder-coated steel, which can withstand exposure to the elements, and choose cushions made from water- and UV-resistant fabric.

3. Consider Shade

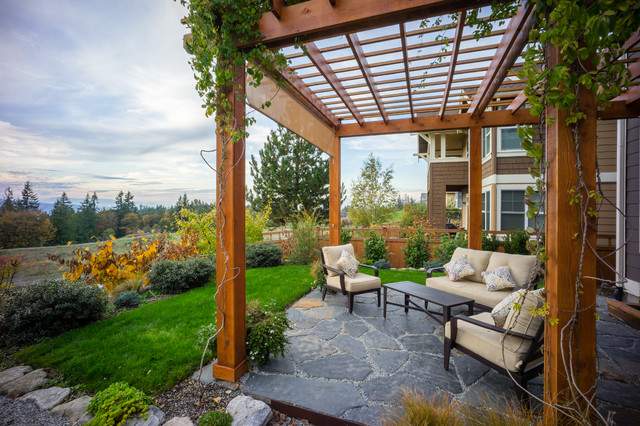
If your primary outdoor hangout spot is in full sun, you’ll likely appreciate some form of shade while eating or lounging outside. Go big with an outdoor pergola, which can also be used for hanging string lights or mounting heaters, or keep it simple with some outdoor umbrellas that can be moved around as needed.

4. Add Light Sources

To keep the festivities going (or at least to be able to see what you’re flipping on the grill) after the sun goes down, outdoor lighting is essential.

Tucson-based landscape designer Elizabeth Przygoda-Montgomery of BOXHILL used multiple light sources in this desert oasis garden, including a flickering fire pit, trees wrapped in white lights, wall-mounted lights, path lights and whimsical floating bobbles. The designer recommends investing in commercial-grade outdoor lighting, which can stand up to the elements and often comes with a 10-year-warranty.

When planning your outdoor lighting setup, be sensitive to wildlife and neighbors. Add only what lighting you need and try to use recommended techniques and fixtures for wildlife friendliness.

5. Provide Heat

Equally as important as light after dark, heat sources can encourage lingering on the patio or over dinner outside once temperatures dip. If you already have a pergola, eaves, or other roof structures, installing wall-mounted electric outdoor heaters is likely the easiest, least visually obtrusive option. Otherwise, plan on having a few freestanding propane heaters that can be rolled onto the patio when needed.

6. Invest in an Outdoor Kitchen or Grill

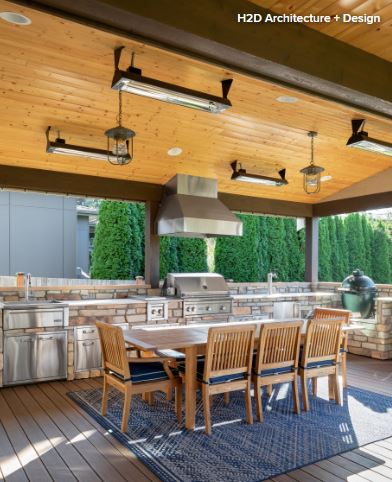
Cooking outdoors always draws people to the action. Outdoor kitchens are often one of the biggest splurges in a backyard design, but they can be worth the investment if you plan on frequently cooking and hosting outside. Depending on your budget, you may also want to consider party-ready features, like warming ovens, ice makers or drink fridges. Alternatively, a fairly basic barbecue will only set you back about $150, and the food will likely be no less delicious than that cooked on a far fancier outdoor kitchen.

7. Give Kids a Place to Play
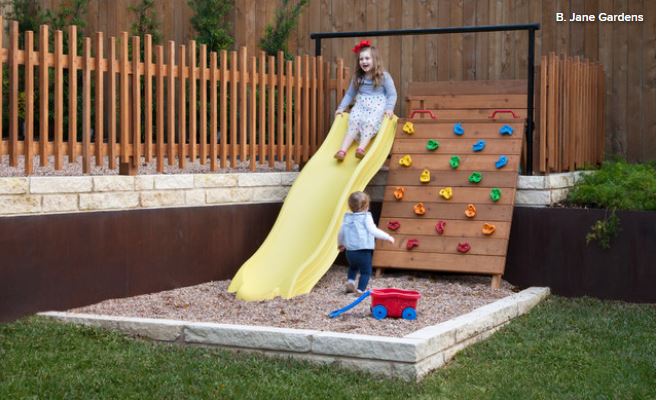
What’s one sure way to get parents to relax and enjoy their yard? Keep children entertained, but within eyesight (for youngsters). When landscape designer B. Jane was remodeling a backyard for a family in Austin, Texas, adding a kids’ play area that was close to the outdoor entertaining space was one of her clients’ top priorities. The designer took advantage of a natural slope in the yard to create a slide and custom climbing wall for kids to enjoy.

8. Build In an Activity Area

Whether you have the materials on hand for cornhole, croquet or another lawn game or go all out and install a bocce court, having the option of an outdoor game can help liven up a backyard. Conversely, you can rally around a food-related activity such as making pizzas in an outdoor oven or on the grill or making s’mores for dessert around a fire pit.

9. Create Multiple Hangout Areas

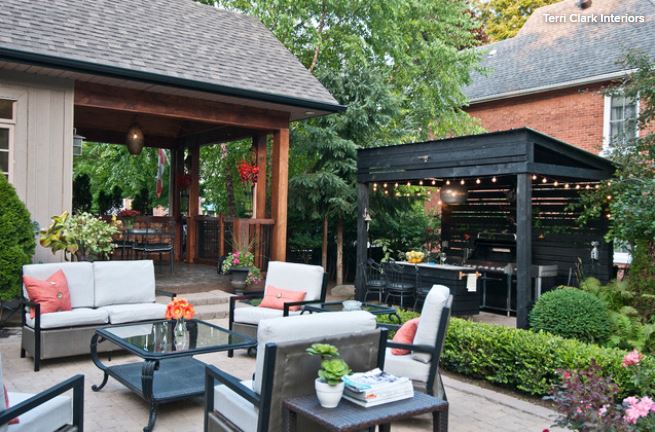
When interior designer Terri Clark set about designing her Toronto backyard, she knew she wanted to create a layout that would enable her to host friends and large gatherings. A large patio under an outdoor pergola allows Clark to set a table for 20 people, while smaller patios close to the house provide a more intimate dining area and seating for medium-size groups. Pathways and open areas foster flow between the spaces.

This article was originally published at Houzz.com.

Exterior Makeover

Whether you’re giving your home a minor makeover or a major face-lift, updating the exterior is a great way to make a positive first impression. The following exterior transformations range from minor (new paint and a garage door) to major (a raised roof to create a usable second floor).

Check out all five exterior makeovers, then let us know which one is the most welcoming to you.


Before

1. Bold Bungalow Makeover

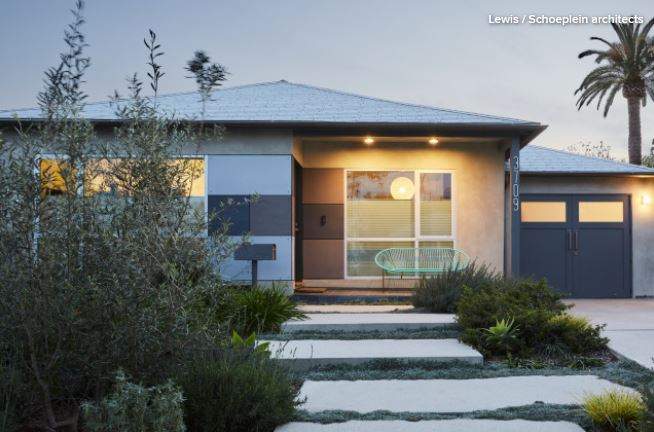
Before: These Los Angeles homeowners knew it was time to refresh their 1950s bungalow. They used Houzz to search the profiles of local architects and landed on Lewis / Schoeplein Architects. The firm worked with the homeowners to completely re-imagine the interior of the house as well as give the former wood-and-stucco exterior a modern makeover with a slight industrial touch.


After

After: The exterior now features siding panels made of fiber-reinforced cement, a durable surface that comes in a variety of colors; it gives the exterior its modern industrial look. “They didn’t want a glass box. They wanted something warm. It’s something we really came together on from a design standpoint,” principal architect Toni Lewis says.

Almost everything else also is new, including the windows, mailbox and landscaping. All of the landscaping is drought-tolerant, with a focus on California native plants.

2. Wood and Windows That Wow

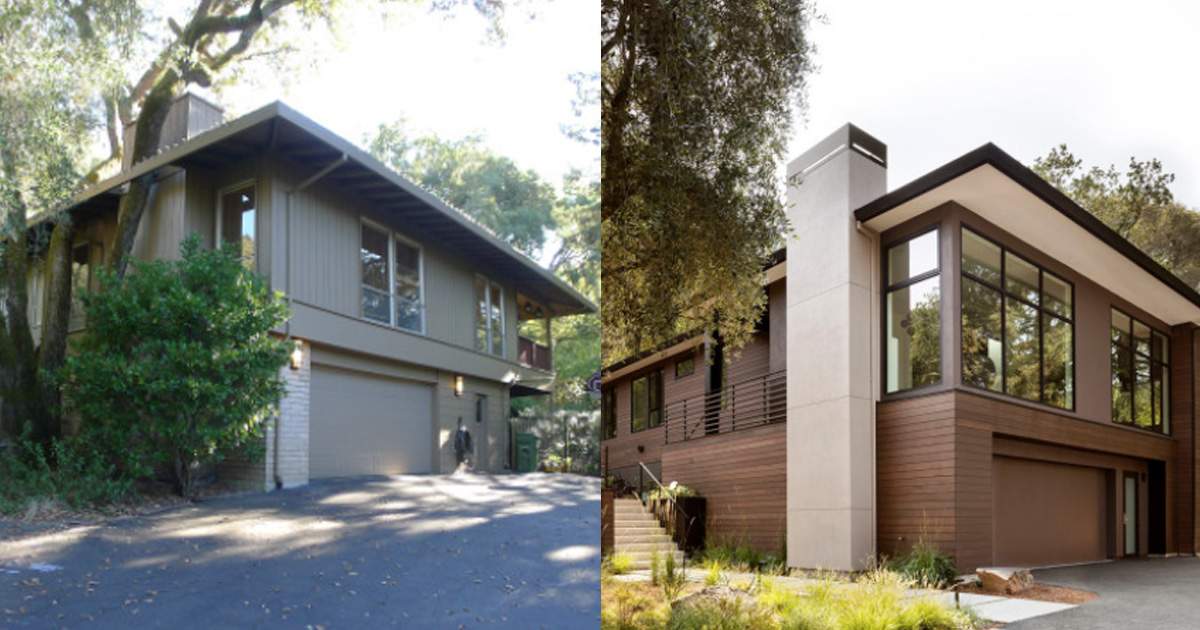
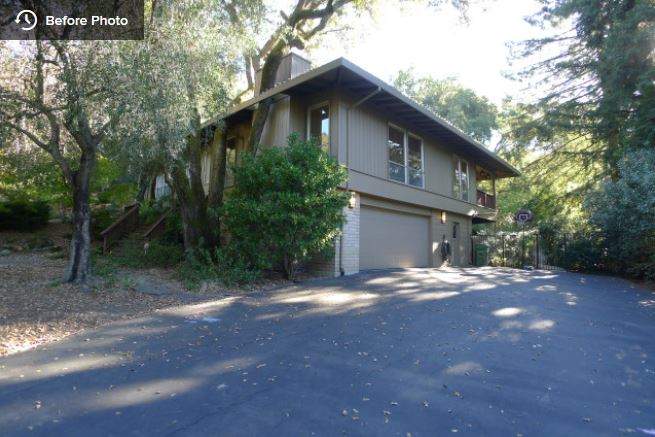
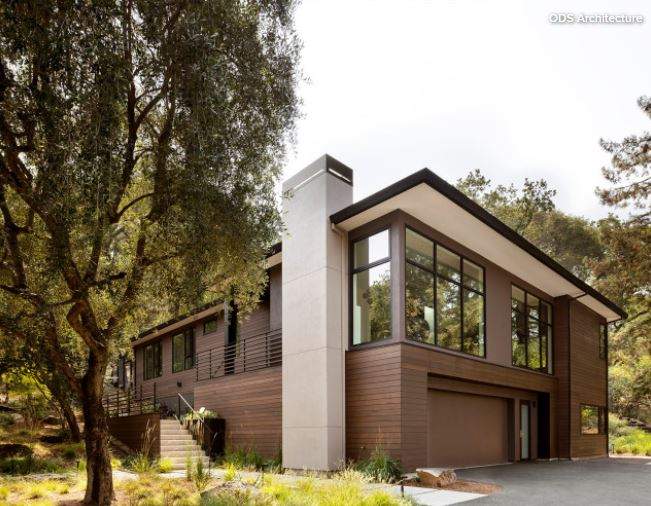
Before: This midcentury home in Lafayette, California, was nestled within the surrounding woodlands, but it didn’t take full advantage of its lush surroundings. The homeowners reached out to ODS Architecture to refresh the home by changing the roofline to accommodate higher ceilings, and by installing new windows and doors to provide more expansive views. The team also added a gorgeous stained wood siding on the exterior’s lower level, and stucco for the main level, chimney and overhang.


After


After: The bottom level of the house is now clad in stained vertical-grain western red cedar siding. The main floor’s exterior is covered in a warm dark gray stucco. A lighter stucco appears under the roof overhangs and the chimney, providing visual contrast. “With all the windows on the main floor, we needed a solid element rather than siding,” architect Alan Ohashi says. “There’s actually a lot going on in this simple-looking facade.”


Before

3. Modern Touchup for a Midcentury Gem

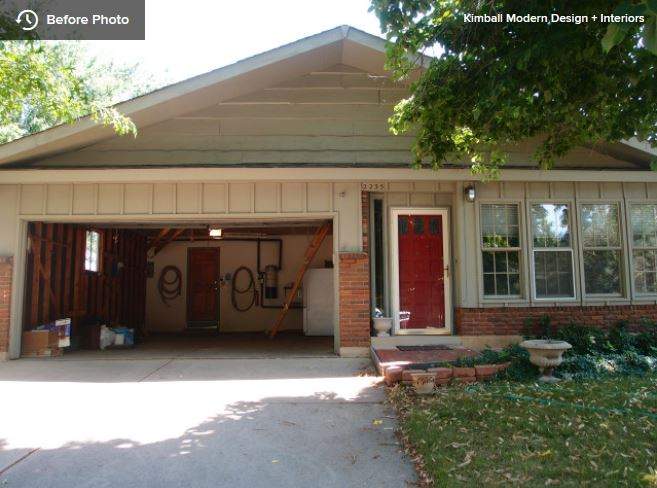
Before: Except for regular maintenance, the exterior of this Boulder, Colorado, house hadn’t changed much since it was built in 1966, in a modern ranch style that was popular for the neighborhood.

The new owners loved the home’s vintage architecture but wanted to modernize it — without losing its charm. To help with this balancing act, they worked with interior designer Kate Van Sluyter of Kimball Modern Design + Interiors, who lightened up the house inside and out.


After


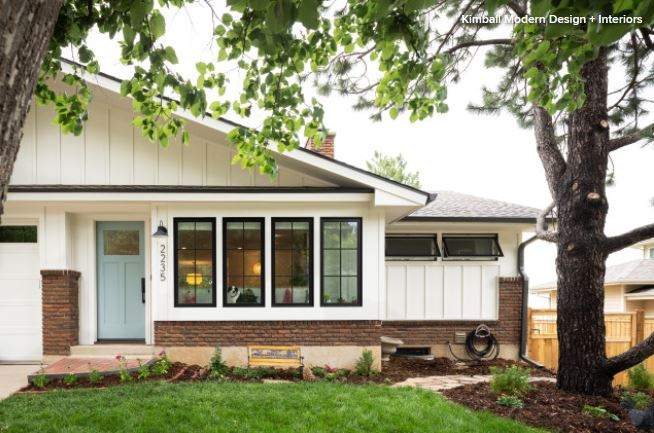
After: Newly painted siding and a new garage door and entry have updated the home while keeping the original appeal. Black-frame windows also add a modern spin, as does a spiffed-up front landscape. “We kept the original red brick trim, because that was something the new owners loved,” Van Sluyter says. “For contrast, we went with a cool blue tone for the front door.”


Before


4. Contemporary Cool

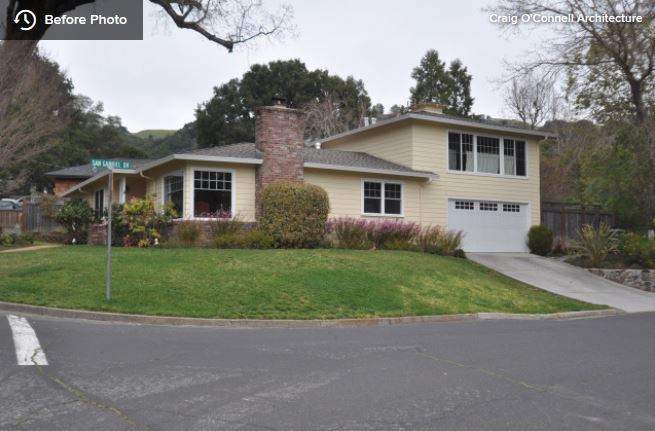
Before: After finding a house in Fairfax, California, that was ideal for their family of four, this couple hired architect Craig O’Connell to help them update it to suit their more contemporary tastes.

The plain yellow home was built in the 1950s but had a style that wasn’t exactly the midcentury modern the homeowners were looking for. “The house is basically a ranch with a rumpus room over the garage,” O’Connell says.

After


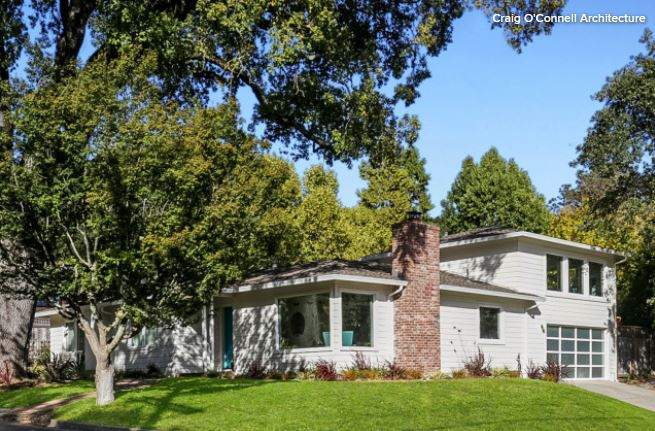
After: The biggest changes to the exterior were painting the existing siding a fresh white, replacing the windows with mullion-free fixed and casement windows, and adding a modern garage door with translucent glass panes. The original brick chimney was left untouched. New plantings around the house offer a more contemporary vibe.


Before


5. Raise the Roof

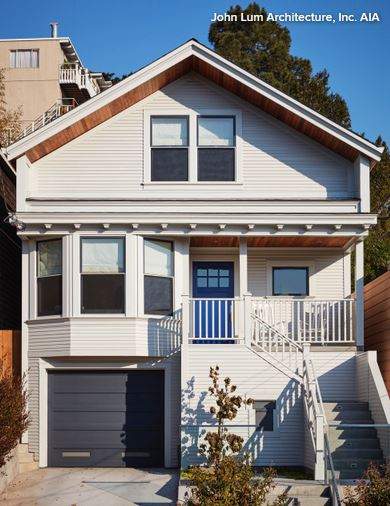
Before: This couple loved their Noe Valley neighborhood in San Francisco, but after having two kids, they found that the small, dark spaces in their 971-square-foot house weren’t conducive to a homey family life.

Architect John Lum saw potential in the Edwardian home’s roofline and backyard, and knew he could come up with something that San Francisco’s Residential Design Advisory Team would approve.

As for his clients’ approval, he used Houzz ideabooks to get a sense of their style early on in the process. “I always ask my clients to share photos and to tell us what they like and what they don’t like about them,” he says. “It really helps us zero in on a design they will like.”

After

After: Lum maintained the original style of the exterior while raising the roof a few feet. He kept the gabled front, matched the new windows on the attic level to the existing windows and used the same cove siding. But he added a few modern touches, such as cedar accents, a new garage door and a brighter color palette. “These little touches indicate that there’s something else happening inside here,” he says.


This article was originally published at houzz.com.

Maintaining a Zen-like space is about much more than style. It’s about cultivating a peaceful place where each object has a reason for being present, whether for its beauty, utility or both. Here are 10 ways to bring a peaceful, balanced feeling to your home.

1. Clear Surfaces Daily

Clutter is visual distraction. Every time your eyes land on a stack of papers, a tangle of jewelry or a pile of laundry, some small part of your mind is at work thinking about dealing with said items. If you want a calmer experience at home, a good way to begin is by making it routine to clear all the surfaces in your house daily. When your eye can skim across clean, clear surfaces throughout your home, it also becomes easier to stay focused on the present moment.

2. De-Clutter and Get Organized

It’s one thing to clear surfaces; it’s quite another to completely declutter your home. But when you have taken the time to go through every closet, drawer and cupboard and whittle down your belongings to the ones you truly need, love or both, a weight lifts. Daily tasks that used to take forever are streamlined; lost items are quickly found; important dates are no longer missed.

3. Get Some Help if You Need It

Sometimes it’s best to admit you need help and let the pros do what they do best. Hire a professional organizer to help clear that clutter, a decorator to help you tap into your style and get your home looking and feeling just the way you want, or an architect to redesign your space.

4. Incorporate the Five Elements

Don’t stop with potted plants — to really embrace nature in your home, make sure all five elements are represented. They are: water (images of water, a fountain, flowers in a bowl of water), earth (stone, plants), fire (candles, incense, fireplace), metal (furniture, tools) and wood (furniture, beams).


5. Keep Floors as Clear as PossibleSimilar to keeping surfaces clear (see item No. 1), having clean, clear floors is a way to streamline your life and keep your attention on the here and now. If piles of things tend to accumulate on your floors, perhaps it’s because there isn’t a better place for them — if that’s the case, make a home for these items so you won’t be tripping over them anymore. As for the floors themselves, keeping them fresh, clean, and dust free makes for a more pleasant space and helps improve indoor air quality.

6. Use Fewer But More Meaningful Decorations

Instead of binging on inexpensive finds, aim to reduce your decor items to include only the ones that you truly love and that hold meaning for you. A few beautiful objects carefully displayed can be so inspiring — reducing allows you to appreciate what you have even more.


7. Soften Your Lighting

Learn to appreciate natural light and use it more. Even when the light starts to fade in the evening, consider sometimes lighting candles instead of flicking on the overheads. And speaking of overheads, if you haven’t done so yet, swap out all of your regular light switches for dimmers — it makes a world of difference to be able to control the glow.

8. Pay Attention to Texture

Do the objects in your home thrill your senses? Consider this as you declutter and whenever you are considering a new purchase. Think of how lovely a chunky, hand-thrown pottery mug feels in the hand versus a machine-made version. Natural materials have some of the best textures — bring more rough jute, nubby linen, cracked old leather, pure silk and raw wood into your home.

9. Use Natural Scents

Have you ever noticed that some of the most beautiful, inspiring shops usually also smell amazing? Or how just the first whiff of aromatherapy oils in a massage therapist’s office instantly puts you at ease? What you smell can have a surprisingly strong effect on how you feel. Create a purifying, calming atmosphere in your home by eschewing artificial fragrances and choosing natural scents like those from beeswax candles, essential oils, natural cleaning products and fresh garden flowers instead.

10. Use Everyday Reminders

In meditation practice sometimes a bell is used as a reminder to refocus your attention on the here and now. Create a list of some things you do multiple times each day, and pick one of them to use as your own version of a meditation bell. It could be anything, as long as it’s something you do often — adjust the window shades, wash your hands, pour a glass of water, check your email. Whenever you find yourself about to do that thing, take a moment to stop, breathe and simply be present.